Setting up a local server for Vorple
You can write Vorple games online with Borogove but you can also install Vorple on your own computer. To test and play Vorple games locally you need to install a local server that can run the web interpreter. Below are instructions for installing the server on different operating systems.
Windows
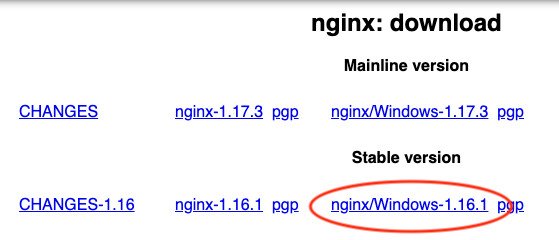
Download Nginx from nginx.org/en/download.html. From that page choose the Stable version. The link looks like "nginx/Windows-x.x.x" where "x.x.x" is the version number. When writing this the latest version was 1.16.1 but new versions are released regularly.
Unzip the package you just downloaded. Run nginx.exe which is inside the zip. Nothing visible happens, but it starts the local server. You can confirm by opening http://localhost in a web browser (just typing "localhost" to the address bar should be enough) which should show a welcome message. (The message says that further configuration is needed but for us the default configuration is good enough.) The server will keep running until you reboot the computer, after which you'll have to run nginx.exe again.
For step-by-step Windows instructions and advice on some common pitfalls, see this thread on Intfiction.org.
macOS
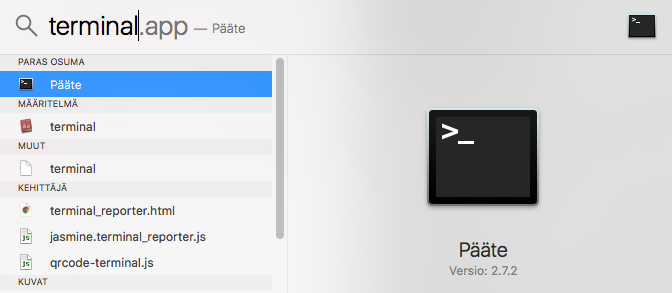
Open Terminal (Applications/Utilities/Terminal.app). You can find the Terminal app easily by opening the Spotlight search by pressing ⌘ SPACE or by clicking on the magnifying glass icon in the top right corner of the screen, and searching for "terminal". The application's icon is a black screen with a white
>_icon. This route is especially useful if you have a non-English operating system and the application and the folder it's in is called something else (see the screenshot below).
Type
python -m http.server --bind 127.0.0.1 8000and press enter. You should see a message that saysServing HTTP on 127.0.0.1 port 8000 (http://127.0.0.1:8000/) ...
To stop the server press CTRL C in the Terminal window.
If the python command shows an error message, the computer might have an older version of Python installed (Python 2). See installpython3.com for instructons. You can also try typing python3 instead of python if the Python 3 version is installed with a different name.
Linux
Same as macOS above, although the method for opening the terminal depends on the Linux distribution and the windowing system. Googling for "open terminal in X" where X is the name of the distribution should find plenty of information. The terminal might also be called "console", "shell" or "command line".
python -m http.server --bind 127.0.0.1 8000
If the python command displays an error you need to install Python 3 or try if it's installed as python3 instead of python.
Setup for Inform 6
First, download the Github repository for the
Inform 6 librairies and decompress it. You can then move your .inf file (or one of
the examples) into the directory where the play.html file and the interpreter
directory are located; you might also want to move the regular I6 librairies and
the compiler there. Then run the server in this directory.
Edit the play.html file and replace "test.ulx" with the correct Glulx game
file name near the end of the file, in the line that says:
// URL to the game file
story: "test.ulx"
The game can now be run by navigating to http://localhost/play.html
(Windows with nginx) or http://localhost:8000/play.html (Mac/Linux with Python)
with a web browser.
Setup for Inform 7
First, download the folder from the GitHub repository
Put the Inform project directly into the folder where the server is running.
For Windows it's the folder called "html" inside the Nginx package.
If the folder's name is html, in Inform 7 you should now have
html/Project Name.inform and html/Project Name.materials folders
(but with your project's name instead of "Project Name").
For macOS and Linux the server is running in the directory where you run the
Python command, so you can just run the command in the directory where the
project already is. The easiest way to get to the correct directory in macOS is
by typing cd + one space character and dragging the folder from Finder to the
Terminal window to get the full path. The command line should now read something
like:
$ cd /home/myusername/path/to/project
but with the folder's actual path (make sure that space after "cd" is there.)
Then press enter. Do this before running the python command and the server
starts directly in the correct place.
 Build the project by clicking Release. Don't click on the "Browse" buttons that
Inform offers after releasing, they won't work.
Open a browser and type http://localhost/ProjectName.materials/Release/play.html
on Windows or http://localhost:8000/ProjectName.materials/Release/play.html
on Mac or Linux to the address bar but replace "ProjectName.materials" with the
actual name of the materials folder.
Once the local server is working, continue to Installing Vorple for Inform 7.
